How To Install Your
Range Hood
-
 Customer Support
877-901-5530 -
 Email Support
Support@Prolinerangehoods.Com -

Venting
Requirements
For Correct Venting
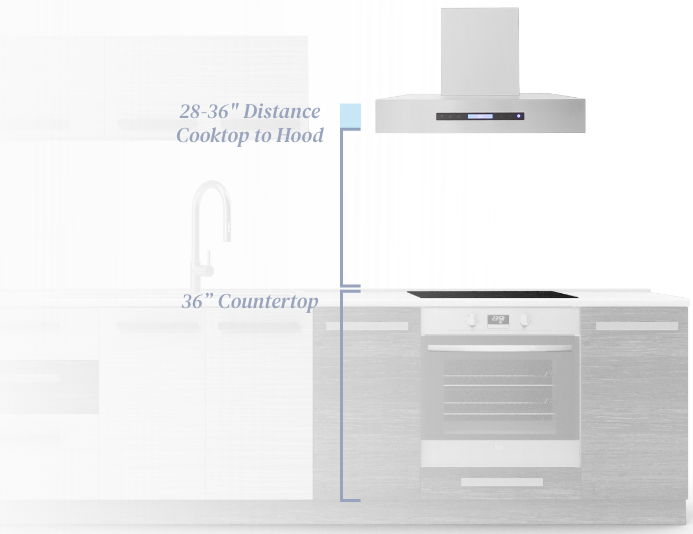
- Allow 28-36" between the top of the cooking surface and the bottom of hood. Allow 36-42” for venting over a BBQ grill.
- The best option is to vent vertically through the roof if possible; vent through a side wall if you cannot vent directly above your hood.
- Use galvanized steel or metal HVAC ducting only.
- For best performance use as few elbows as possible, with no more than two 90° elbows. Include at least 18" straight from the transition piece before using an elbow in the duct and make sure there is at least 18" of straight vent between any elbows.
- Use duct tape or HVAC tape to seal all joints in the vent system.
- Use caulking to seal exterior openings around the cap.
- Always keep the duct clean to ensure proper airflow.
What To Avoid When Venting
Your Range Hood
- Terminate the vent system into an attic or other enclosed area.
- Mount the range hood outside of the 28"-36" height above the cooking surface. Hoods mounted too low may be susceptible to heat or fire damage. Hoods mounted too high will perform poorly and become inefficient.
- Use 4" (10.2 cm) laundry-type wall caps.
- Use plastic venting or plastic ducting.
- Don't use more than 30' of ducting, and for each elbow that is added to the duct, this limit goes down by 5'. i.e. If your duct has 2 elbows, then don't use more than 20' of ducting.
- Install a range hood lower than 36" over a BBQ.
- Reduce the diameter of your duct work from the hood outlet size.

Venting
Options
Vertical Roof Venting
Ducting goes vertically above the range hood through the house’s roof. This is the most efficient way to vent and the preferred venting option for all Wall mounted or Island hoods.
A roof cap is needed to protect the ducting from the exterior. Seal the roof cap with caulking.

Horizontal Wall Venting - Option 1
This is an alternative option to vertical venting. Ducting goes horizontally from the range hood through the house’s side wall. Depending on the model of hood, venting can go straight through an exterior wall from the back of the hood if the hood has an option to rotate the blower panel (Option 1). This option is only available on specific models.
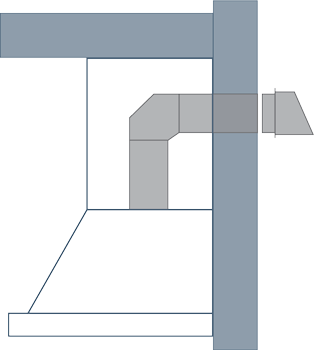
The second option is to vent off the top of the blowers and elbow off of the top of the hood, through the wall (Option 2). For correct venting please allow at least 18" of straight vertical travel off the top of the transition piece before attaching the elbow. (As seen)
A side wall cap is needed to protect the ducting from the exterior. Seal the side wall cap with caulking.
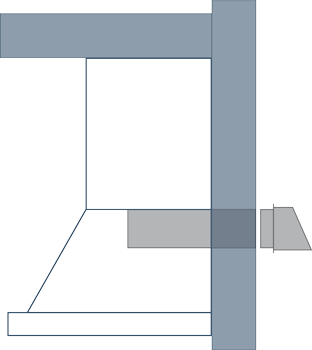
Horizontal Wall Venting - Option 2
This is a second alternative option to vertical venting. Ducting runs vertically at least 18” then horizontally through an exterior wall. Use a side wall cap to protect the ducting from the exterior.
Seal the side wall cap with caulking.
Wall Hood
Preparation
 Power Drill
 Screwdrivers
 Drill Bits
 Tape Measure
 Masking Tape
 Pencil/Marker
- Metal or Aluminum HVAC Tape
 Level
Level Wall Anchors*
 Scissors/Box Cutter
Inspect Range Hood
Check the contents of your box. They should include:
- Range Hood
- Wall or Ceiling Mounting Bracket
- Hardware
- Chimney (Applies to Specific Models)
- Support Brackets (Applies to Specific Models)
- Transition Duct (Applies to Specific Models)
Steps
- Plug in and test controls, lights, and fan.
- Inspect for any damage caused during shipping.
- Report any damage to Proline Customer Service within 5 days of receipt of hood by calling 877.901.5530 or emailing support@prolinerangehoods.com
Prepare Ductwork
Plan where your ductwork will be located. Install the proper sized ductwork and exterior roof or wall cap, depending on where you will be venting your hood to the exterior.
Ductwork should already be punched through the ceiling (or wall if the ceiling is not an option) and ready to hook up to the range hood before beginning installation. See venting requirements above.
Note
These are general installation directions for a Wall hood. Please refer to your model’s instructional manual for specific instructions and other installation options.
We suggest a surge protection for your range hood, since some types of electrical surges can cause the circuit to break.
Wall Hood
Installation
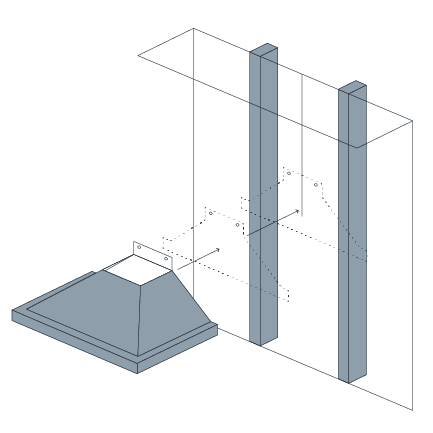
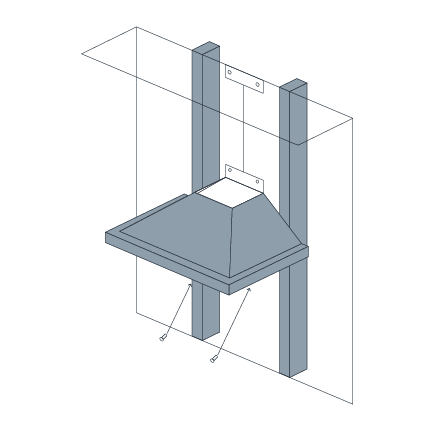
First draw these markings on the installation area wall.
- Center line of installation area.
- Location of wall studs nearest to the center line. (One on each side)
- Horizontally level line 28-36" above the cook top surface. (Location of the bottom of the range hood)
Find location for mounting the range hood
- Trace the outline of your hood on a panel of its cardboard box.
- Find the mounting holes and center point of the hood (directly between the mounting holes) and mark them on the cardboard panel.
- Carefully cut out the cardboard outline.
- Tape the cardboard cutout panel to the wall lining it up with the horizontal line (bottom of hood location) and matching the center point with the center line of the installation area.
- Poke holes through the mounting points on the cardboard marking the locations on the wall and remove the cardboard.
- If using wall anchors, pre-drill the mounting holes where your marks are with the correct size bit and insert the wall anchors.*
- Screw in mounting screws to the marked studs and or wall anchors, leaving roughly a 1/4" gap. This gap will be used to hang the hood in STEP 3.

Install ceiling chimney bracket
- Place the chimney bracket against the ceiling, matching the center point of the bracket with the center line of the installation area.
- Mark the locations of the bracket holes on the wall and drill the holes where the locations are marked (The size of drill bit will depend on the size of hole that the wall anchor calls for).
- Insert wall anchors in the drilled holes and screw the bracket into place. The chimney will mount to the bracket.

Hang range hood and connect ductwork
- Hang the hood on the mounting screws in place from STEP 1. Tighten the mounting screws to secure the hood. The bottom of the hood should match up with the the horizontal line marked on the wall.
- Drill holes in the back of the hood lining up with the wall studs that have been previously marked (Use an appropriate drill bit for the mounting screws included in the hardware bag).
- Secure the hood to the wall studs using the screws included in the hardware bag.
- Attach the previously installed ductwork to the hood’s blowers, taping it in place using duct tape or HVAC tape.
- Power the hood by connecting the three pronged plug to a nearby electrical outlet or by hardwiring the hood to a power source (Always consult an electrician before directly wiring a hood to a power source).
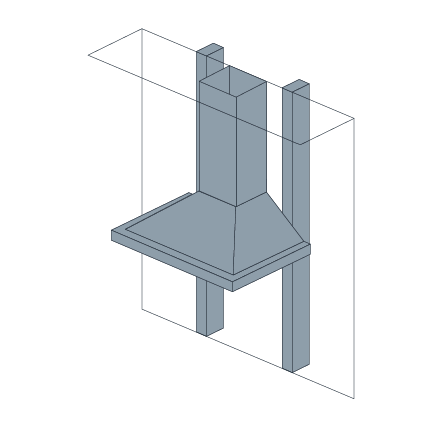
Install chimney
- Remove protective film coating.
- Place the two pieces of chimney on top of the range hood, making sure the vent in the upper section is towards the top and the upper section slides inside the lower section in a telescoping manner.
- Attach the top section of the chimney to the mounting bracket, allowing the bottom section of the chimney to rest securely on the top of the hood.
- Screw the base of the chimney to the top of the hood (if there are mounting holes available)
Install grease filter
- Remove protective tape or film coating.
- Insert filter in to place.
This concludes the installation
of a wall hood
If you have any questions about the installation process please call or e-mail us.
-
Customer Support
877-901-5530 -
Email Support
Support@Prolinerangehoods.Com
Island Hood
Preparation
- Power Drill
- Screwdrivers
- Drill Bits
- Tape Measure
- Masking Tape
- Pencil/Marker
- Metal or Aluminum HVAC Tape
 Plumb Bob/Laser Level
- Scissors/Box Cutter
 2x4s or Appropriate Framing Material*
Inspect Range Hood
Check the contents of your box. They should include:
- Range Hood
- Ceiling Mounting Bracket
- Hardware Bag
- Chimney
- Support Brackets
- Transition Duct (Applies to Specific Models)
Steps
- Plug in and test controls, lights, and fan.
- Inspect for any damage caused during shipping.
- Report any damage to Proline Customer Service within 5 days of receipt of hood by calling 877.901.5530 or emailing support@prolinerangehoods.com
Prepare Ductwork
Plan where your ductwork will be located. Install the proper sized ductwork and exterior roof or wall cap, depending on where you will be venting your hood to the exterior.
Ductwork should already be punched through the ceiling and ready to hook up to the range hood before beginning installation. See venting requirements above.
* 2x4s and other additional framing material may be required if installing extra supports, or if ceiling joists are not available in installation location
Note
These are general installation directions for an island hood. Please refer to your model’s instructional manual for specific instructions and other installation options.
We suggest a surge protection for your range hood, since some types of electrical surges can cause the circuit to break.
Island Hood
Installation
First draw these markings on the installation area wall.
- Center line of installation area.
- Location of ceiling joists nearest to the installation area. (One on each side)
Mark ceiling
- Find the joists in your ceiling.
- Find and mark the center point directly above your cooktop using a plumb bob or laser level to line them up accurately.
- Place the ceiling bracket on the ceiling around the center point. (Make sure it is square with your cooktop.) Ensure that the bracket intersects the joists in your ceiling. If it doesn’t, you must frame supports for securing the ceiling bracket.*
- Trace the outline of the ceiling bracket onto the ceiling.
- Trace a circle where the ducting will go.
- Mark the 4 corners where you will drill the holes.
*For best results, consult a building professional
Install ceiling bracket
- Drill holes into four ceiling marks from Step 1. Make sure you drill through ceiling joists or the added framing.
- Cut out a hole in the ceiling where the ducting will go and finish preparing the ductwork.
- Place chimney bracket against ceiling and screw securely into place.
- Drop the ducting and electrical work through the ceiling.

Install support brackets:
- Place brackets vertically inside the four corners of the ceiling bracket.
- Extend the brackets to the appropriate length. (The bottom of the hood should be 28”-36” above the cooktop).
- Screw all support brackets to the ceiling mounting bracket securing them tight.
Install chimney
- Slide inner chimney sleeve over support brackets, covering the ceiling bracket.
- Screw into place at the top of ceiling bracket.
- Slide outer chimney sleeve over inner chimney sleeve.
- Adjust until the bottom chimney sleeve is a few inches above the bottom of the support brackets. You may want to use masking tape to help hold the chimney in place while you proceed to Step 5.
Attach hood
- If your hood comes with a transition ducting piece, secure it to the base of your hood before mounting.
- Place the base of the hood directly under the chimney.
- Screw hood to the support brackets on all four corners.
- Feed electrical and ducting work through chimney.
- Power your hood by hardwiring your hood to a power source or by plugging it in to a nearby electrical outlet if there happens to be one available.*
- Slide outer chimney sleeve down into place, meeting the top of the hood.
*Always consult an electrician before directly wiring a hood to a power source.
This concludes the installation
of an island hood
If you have any questions about the installation process please call or e-mail us.
-
Customer Support
877-901-5530 -
Email Support
Support@Prolinerangehoods.Com
Under Cabinet Hood
Preparation
- Power Drill
- Screwdrivers
- Drill Bits
- Tape Measure
- Masking Tape
- Pencil/Marker
- Metal or Aluminum HVAC Tape
- Level
- Wall Anchors*
- Scissors/Box Cutter
Inspect Range Hood
Check the contents of your box. They should include:
- Range Hood
- Ceiling Mounting Bracket
- Hardware Bag
- Chimney
- Support Brackets
- Transition Duct (Applies to Specific Models)
Steps
- Inspect for any damage caused during shipping.
- Plug in and test controls, lights, and fan.
- Report any damage to Proline Customer Service within 5 days of receipt of hood by calling 877.901.5530 or emailing support@prolinerangehoods.com
Prepare Ductwork
Plan where your ductwork will be located. Install the proper sized ductwork and exterior roof or wall cap, depending on where you will be venting your hood to the exterior.
Ductwork should already be punched through the ceiling (or wall if the ceiling is not an option) and ready to hook up to the range hood before beginning installation. See venting requirements above.
Under Cabinet Hood
Installation
First draw these markings on the installation area wall.
- Center line of installation area.
- Location of ceiling joists nearest to the installation area. (One on each side)
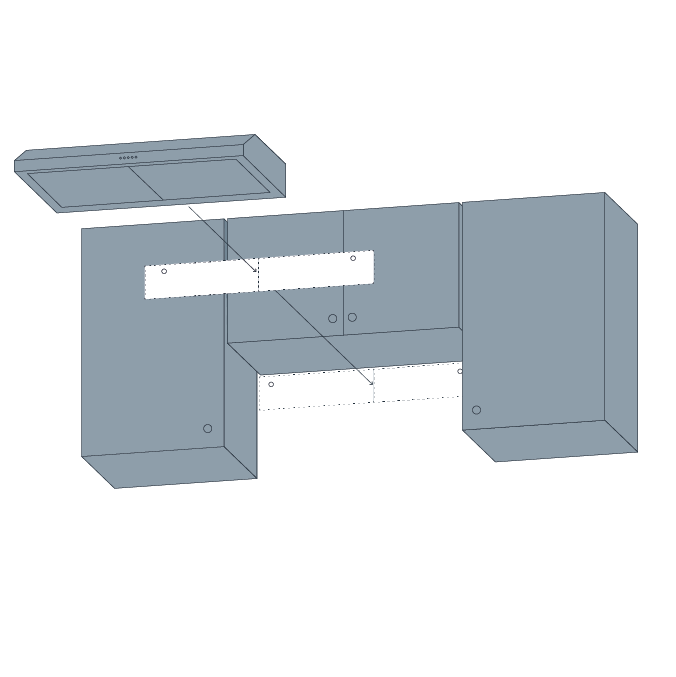
Find location for mounting the range hood
- Trace the outline of your hood on a panel of its cardboard box.
- Find the mounting holes and center point of the hood (directly between the mounting holes) and mark them on the cardboard panel.
- Carefully cut out the cardboard outline.
- Tape the cardboard cutout panel to the wall leaving a small gap (roughly 1/8") below the bottom of the cabinet . Match the center point with the center line of the installation area.
- Poke holes through the mounting points on the cardboard marking the locations on the wall and remove the cardboard.
- Pre-drill the mounting holes where your marks are with the correct size drill bit.
- Screw in mounting screws, leaving roughly a 1/4” gap. This gap will be used to hang the hood in Step 2.
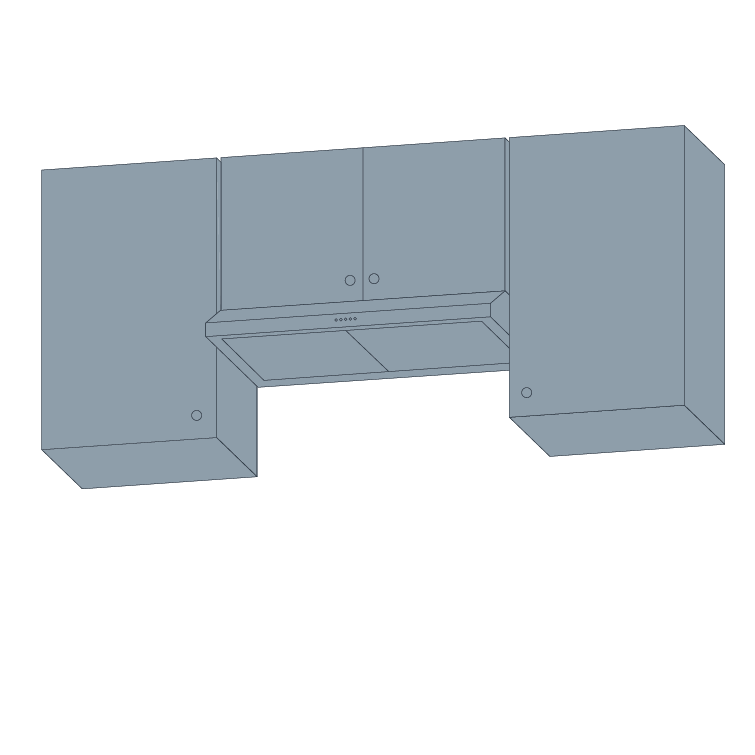
Mount the range hood and connect ductwork
- Carefully hang the hood on the mounting screws in place.
- Tighten the mounting screws to secure the hood. The bottom of the hood should match up with the the horizontal line marked on the wall.
- Using the knockouts in the top of the hood, screw the top of the hood in to the bottom of the cabinet above.
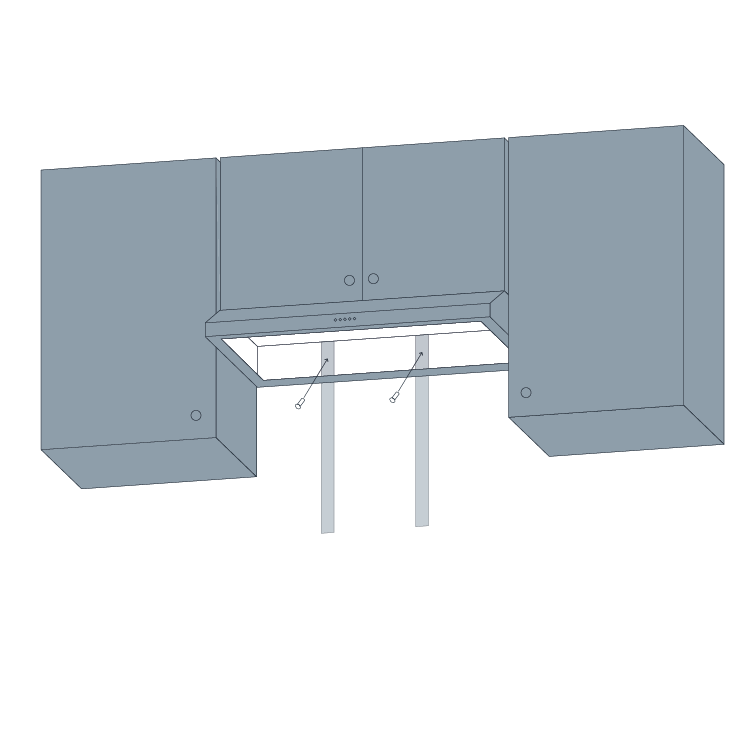
- Drill holes in the back of the hood lining up with the wall studs that have been previously marked.* Only drill holes if the knockouts in the back of the hood do not match up.
- Secure the hood to the wall studs using the screws included in the hardware bag. Additionally, you may use the knockouts in the back of the hood to add more screws.
- Attach the previously installed ductwork to the hood’s blowers, taping it in place using aluminum or HVAC tape.
- Power the hood by connecting the three pronged plug to a nearby electrical outlet or by hardwiring the hood to a power source**.
*Use an appropriate drill bit for the mounting screws included in the hardware bag.
**Always consult an electrician before directly wiring a hood to a power source.
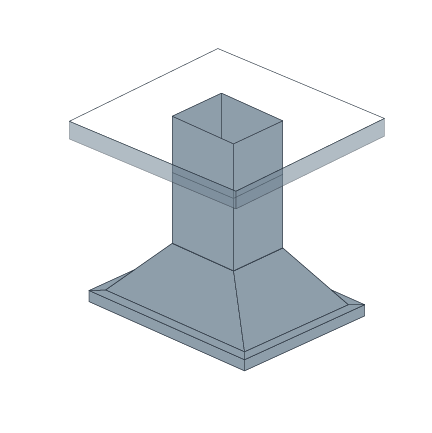
Do you need a chimney?
If you're looking for a way to cover the space on top of your range hood, we offer a few options! If you have one of the following range hood models: PLJW 101, 102, 105, 108, 109, PLFW 812, or ProVW, we have a three-piece chimney selection available in three different heights: 12 inches, 24 inches, or 36 inches, depending on your needs.
To install the chimney, follow these two simple steps:
- Remove the chimney from its box and mount the sides (or just the front part if that's all you need). A video with instructions for mounting is available below. Note that if you only need the front part, that's okay too.
- Mount the chimney to the top of your range hood using screws.
For more information and detailed instructions
This concludes the installation
of an under cabinet hood
If you have any questions about the installation process please call or e-mail us.
-
Customer Support
877-901-5530 -
Email Support
Support@Prolinerangehoods.Com
Insert Hood
Preparation
- Power Drill
- Screwdrivers
- Drill Bits
- Metal or Aluminum HVAC Tape
 A Friend to Help
Inspect Range Hood
Check the contents of your box. They should include:
- Range Hood
- Ceiling Mounting Bracket
- Hardware Bag
- Chimney
- Support Brackets
- Transition Duct (Applies to Specific Models)
Steps
- Inspect for any damage caused during shipping.
- Plug in and test controls, lights, and fan.
- Report any damage to Proline Customer Service within 5 days of receipt of hood by calling 877.901.5530 or emailing support@prolinerangehoods.com
Prepare Ductwork
Plan where your ductwork will be located. Install the proper sized ductwork and exterior roof or wall cap, depending on where you will be venting your hood to the exterior.
Ductwork should already be punched through the ceiling (or wall if the ceiling is not an option) and ready to hook up to the range hood before beginning installation. See venting requirements above.
Insert Hood
Installation
First draw these markings on the installation area wall.
- Center line of installation area.
- Location of ceiling joists nearest to the installation area. (One on each side)
Install the adaptor
Besides the ProVL, all inserts have blowers that connect to ductwork.
To make the installation easy, we send you an airtight transition piece that connects the range hood and the duct.
Attach this to your hood using the screws provided with your insert
Lift the insert into the cabinet or custom hood
Gently lift the range hood insert inside the custom hood or cabinetry. Ask a friend to help so you can attach the duct in step 3.
Attach the duct to your range hood
Attach the duct to the adaptor and seal it airtight with aluminum duct tape. This keeps the greasy cooking exhaust from escaping back into your kitchen.
Screw the insert into the cabinet
Using the screws in the box, drill the insert into the cabinet through each of the four holes on each corner of the hood.
Attach and seal the ductwork to the range hood
- Attach the duct transition piece to the top of your insert. Then, use the included screws to attach the transition to your ductwork. The ductwork should already be punched through the ceiling (or wall if the ceiling is not an option) and ready to hook up to the range hood before beginning the installation.
- Use aluminum tape to seal the ductwork to the transition piece. For the best results, make sure that you seal the duct air tight.
- Attach a wall or roof cap to the exterior wall or roof. A cap helps keep debris and dirt from entering your duct. Use caulking to seal exterior openings around the wall or roof cap
This concludes the installation
of an insert hood
If you have any questions about the installation process please call or e-mail us.
-
Customer Support
877-901-5530 -
Email Support
Support@Prolinerangehoods.Com
Flush Mount Hood
Preparation
- Power Drill
- Screwdrivers
- Drill Bits
- Tape Measure
- Masking Tape
- Pencil/Marker
- Metal or Aluminum HVAC Tape
- Level
- Wall Anchors*
- Scissors/Box Cutter
Inspect Range Hood
Check the contents of your box. They should include:
- Range Hood
- Ceiling Mounting Bracket
- Hardware Bag
- Chimney
- Support Brackets
- Transition Duct (Applies to Specific Models)
Steps
- Inspect for any damage caused during shipping.
- Plug in and test controls, lights, and fan.
- Report any damage to Proline Customer Service within 5 days of receipt of hood by calling 877.901.5530 or emailing support@prolinerangehoods.com
Prepare Ductwork
Plan where your ductwork will be located. Install the proper sized ductwork and exterior roof or wall cap, depending on where you will be venting your hood to the exterior.
Ductwork should already be punched through the ceiling (or wall if the ceiling is not an option) and ready to hook up to the range hood before beginning installation. See venting requirements above.
Decide Where to Install Your Flush Island Hood

Flush Mount Hood
Installation
First draw these markings on the installation area wall.
- Center line of installation area.
- Location of ceiling joists nearest to the installation area. (One on each side)
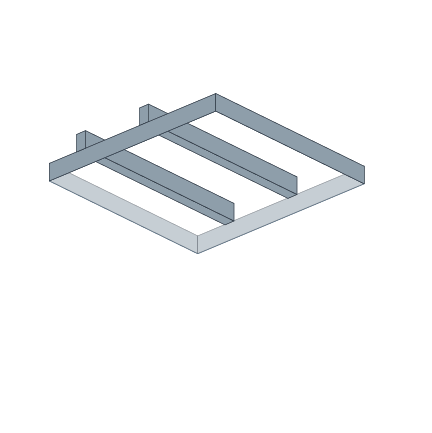
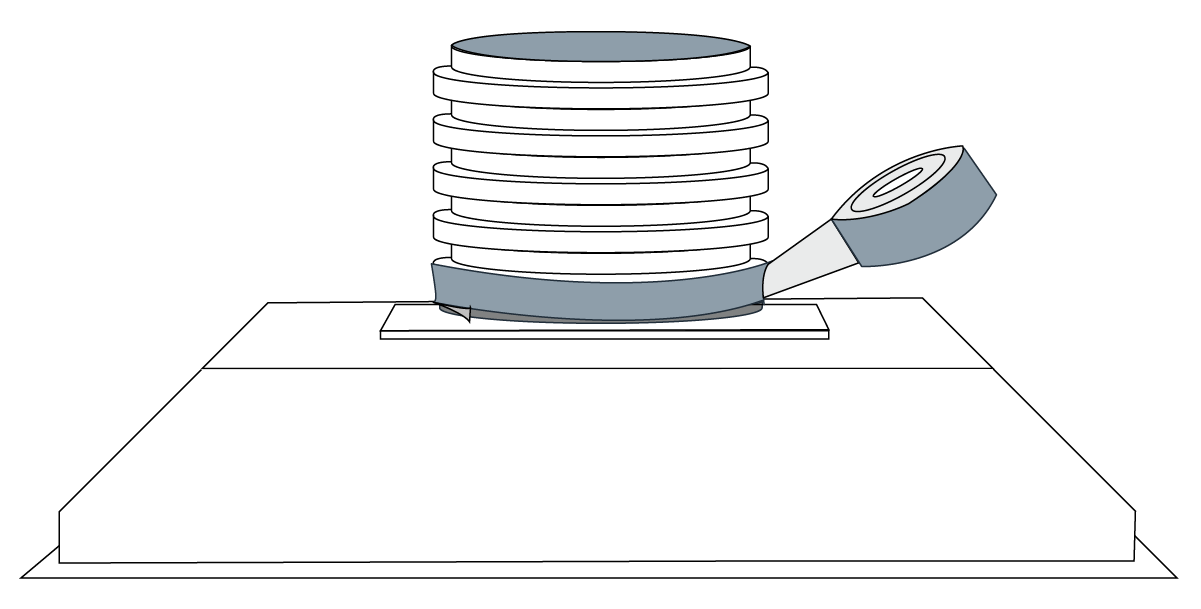
Build the Wood Frame
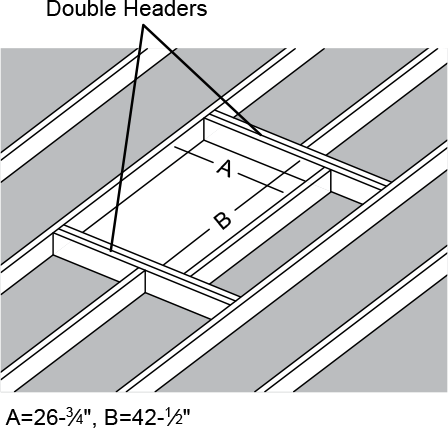
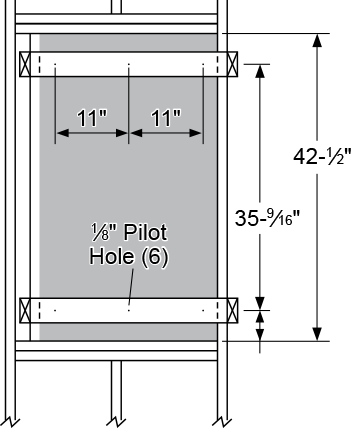
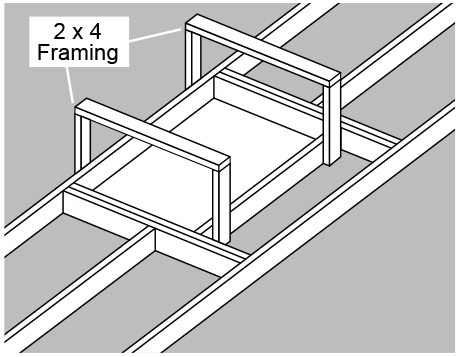
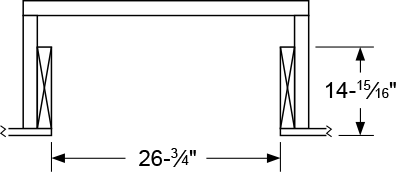
The hood must be centered over the cooktop. Make sure there is enough room in your ceiling for the 44” hood and its ductwork. For the best performance, mount your hood between 36” and 72” above the cooktop. You may need to cut the joists in your ceiling to make room for this frame.
Use joist-size lumber to build the range hood frame. At a minimum, the wood frame must be able to support the weight of the island hood.
The wood frame must support its own weight plus the weight of the island hood.
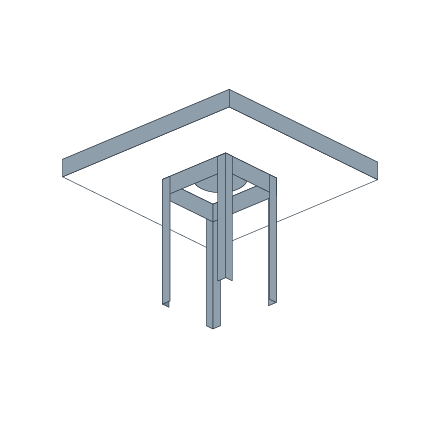
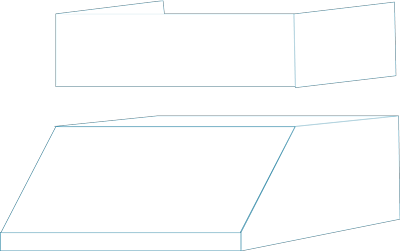
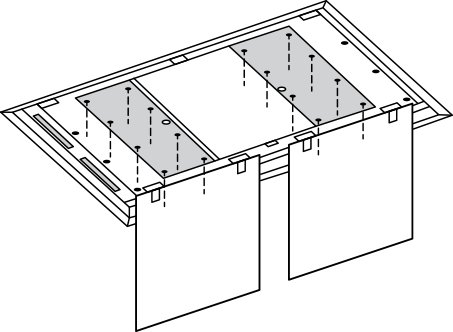
Open the perimeter panels and remove the grease filters
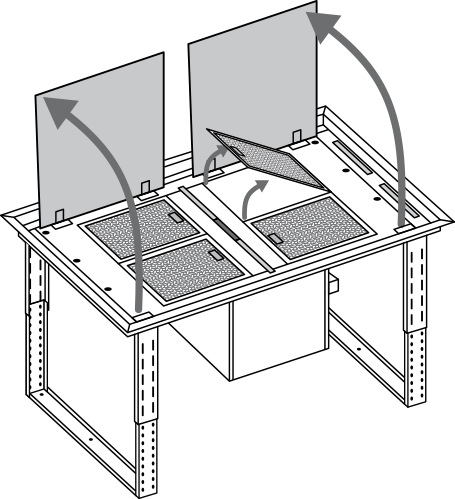
Remove the two interior panels by unscrewing eight screws from each panel
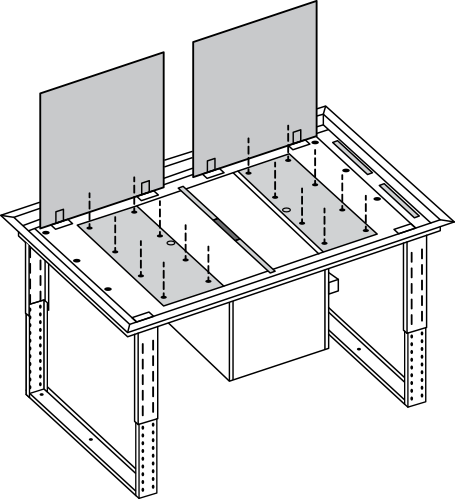
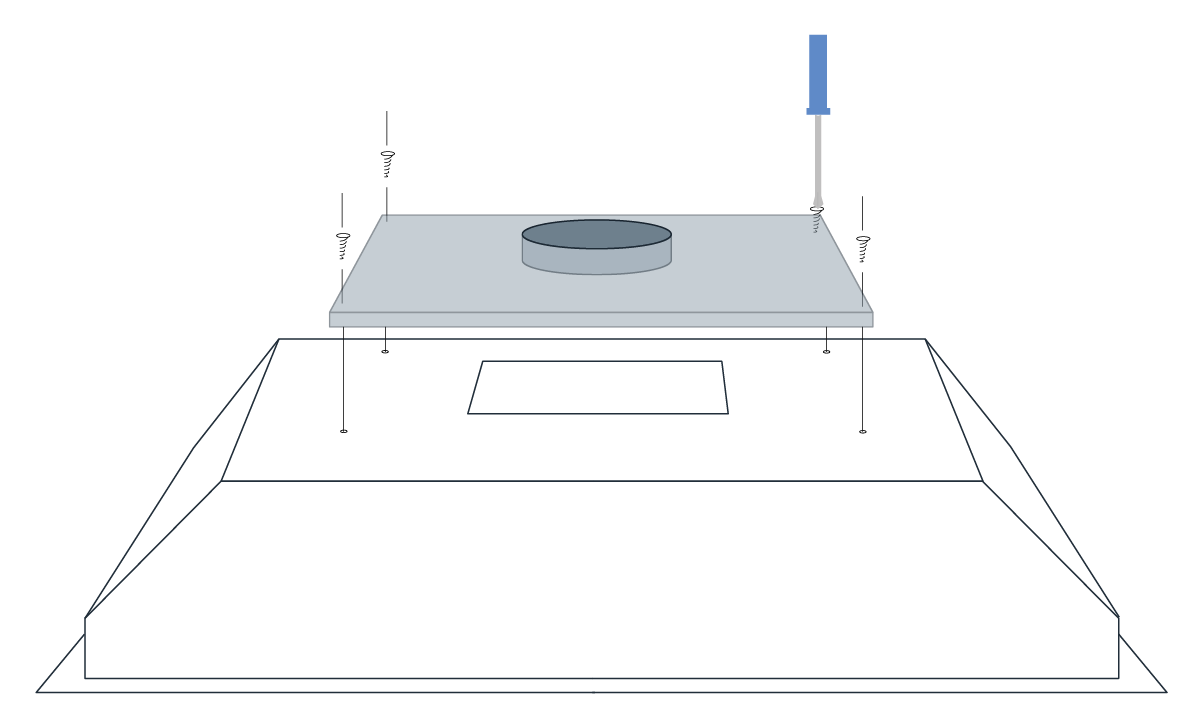
Install two 6" round outlet adapters to the hood with the provided mounting screws

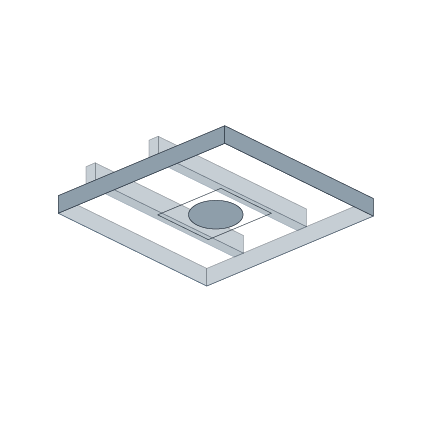
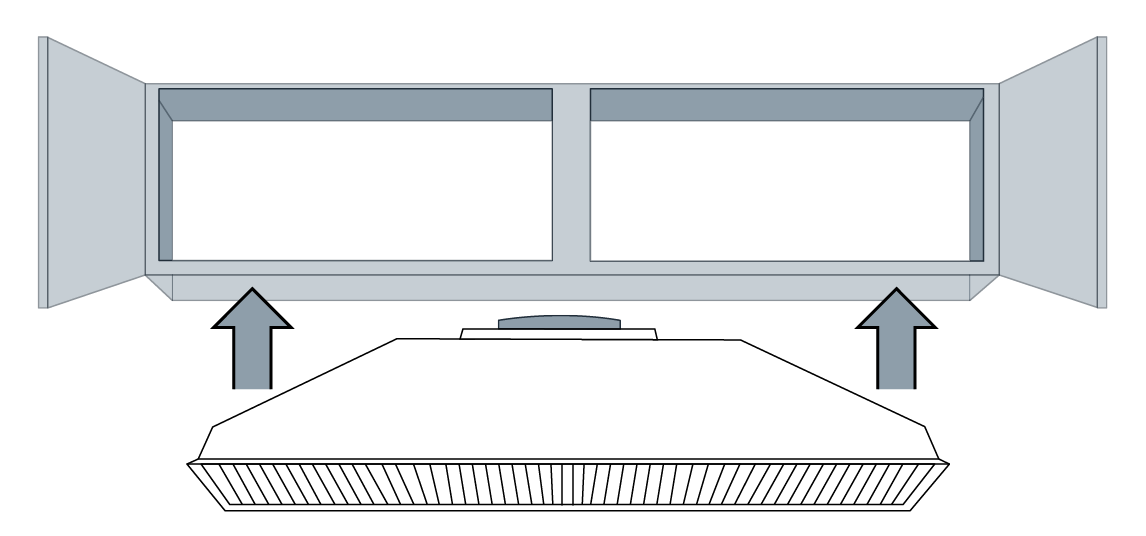
Lift range hood into the ceiling opening. Ask a friend for help so you don’t risk an injury. The range hood is quite heavy
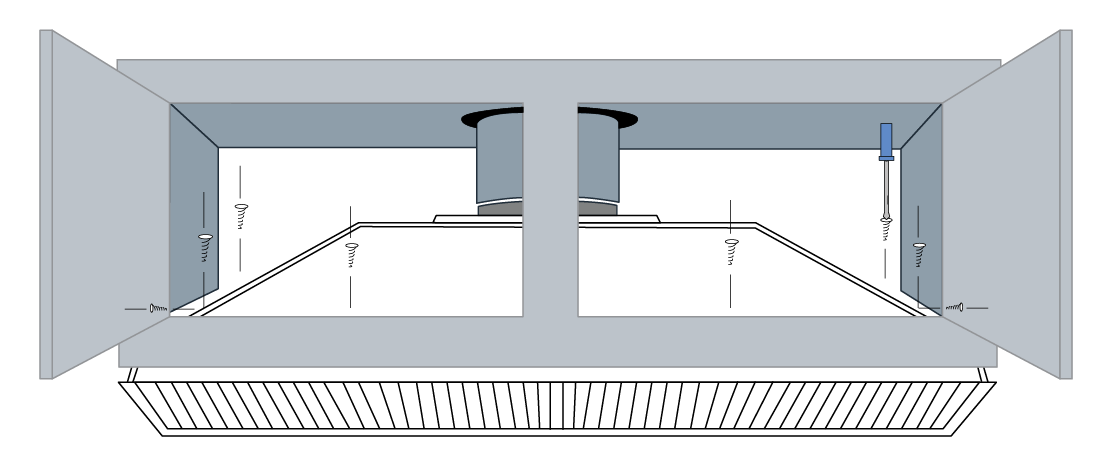
Use the lag bolts and washers to secure the wooden support in place
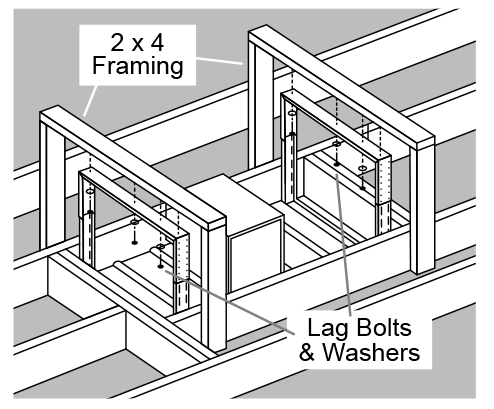
Adjust the support frame until the range hood is flush with your ceiling

Connect rigid ductwork to the range hood. Apply aluminum duct tape to all joints to ensure the system is completely airtight.
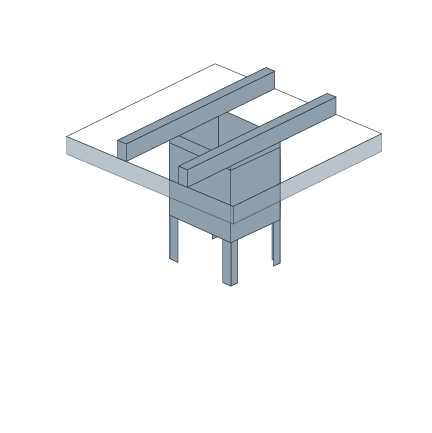
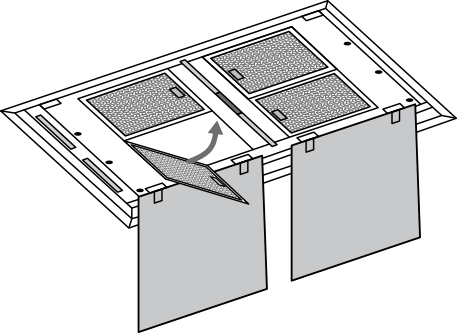
Reinsert the two panels you removed in step two
Reinstall the grease filters
This concludes the installation
of a flush mount hood
If you have any questions about the installation process please call or e-mail us.
-
Customer Support
877-901-5530 -
Email Support
Support@Prolinerangehoods.Com
Recirculating Kit
Preparation
What will
you need?
- Power Drill
 Wood Screws
 (6-8) Self-Tapping Metal Screws
- Tape Measure
- Double Sided Foam Tape
- Pencil
Inspect Recirculating Kit
Check the contents of your box. They should include:
- Recirculating Kit
- Charcoal Filter (Pre-installed)
Steps
- Inspect for any damage caused during shipping.
- Do not install if the recirculating kit is damaged or you are unsatisfied with it.
- Report any damage to Proline Customer Service within 5 days of receipt of hood by calling 877.901.5530 or emailing support@prolinerangehoods.com
Wall Installation
- Fasten the bottom of the recirculating kit to the top of your range hood by using 4-6 evenly spaced self-tapping screws.
- Join the top panel of the hood to the bottom flange of the recirculating kit by drilling and placing these screws from the under side of the hood.
- Optional: Apply strips of self-stick, double sided foam tape around the bottom perimeter of the recirculating kit before joining with screws to provide more adhesion, minimize rattling, and dampen noise.
- Finish installation by mounting the hood and recirculating kit, through the back of the hood, to the desired location on the wall. Follow the detailed instructions in the previous section, Under Cabinet Hood Installation.
*Range hood needs to be installed in secure studs or supports. Wall anchors can be used for additional support and will vary depending on wall material and the weight of the range hood being installed.
Under Cabinet Installation
- Mount the Recirculating Kit in its desired location to the bottom of your cabinet, using wood screws or other appropriate hardware.
- Fasten the top of your hood to the bottom of the recirculating kit by using 6-8 evenly spaced self-tapping screws.
- Join the top panel of the hood to the bottom flange of the recirculating kit by drilling and placing these screws from the under side of the hood.
- Optional: Apply strips of self-stick, double sided foam tape around the bottom perimeter of the recirculating kit before joining with screws to provide more adhesion, minimize rattling, and dampen noise.
- Finish installation by mounting the hood and recirculating kit, through the back of the hood, to the desired location on the wall.
This concludes the installation
of a recirculating kit
If you have any questions about the installation process please call or e-mail us.
-
Customer Support
877-901-5530 -
Email Support
Support@Prolinerangehoods.Com
Inline Blower
Preparation
What will
you need?
- Power Drill
- Screwdrivers
- Drill Bits
- (2) Duct Transition Pieces**
- (12) Self-Tapping Metal Screws
- (2) Wood Screws or Lag Bolts*
- Aluminum HVAC Tape
- 2x4s or Appropriate Framing Material***
* Use 1/4” Diameter Lag Bolts or #14 Wood Screws to fix the blower mount bracket to the wall. Length will vary depending on material you are fastening to.
** Duct transitions may be required to step down the intake and exhaust openings of the blower to match the size of ducting you are using. Transition pieces can be purchased at any HVAC or home improvement store.
*** 2x4s and other additional framing material may be required if installing extra supports.
Inspect Inline Blower
Check the contents of your box. They should include:
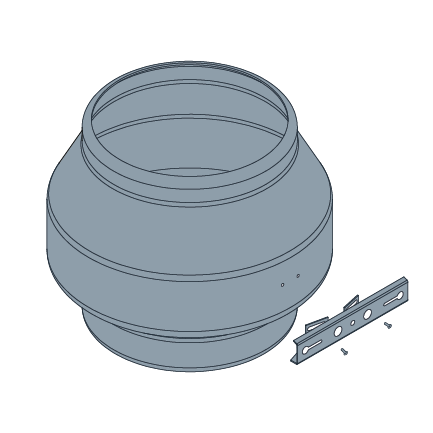
- Inline Blower
- Mounting Bracket
- Hardware Bag
Steps
- Plug in and test controls, lights, and fan.
- Inspect for any damage caused during shipping.
- Report any damage to Proline Customer Service within 5 days of receipt of hood by calling 877.901.5530 or emailing support@prolinerangehoods.com
Find Blower Mounting Location
Find an area along the desired path of your ductwork where you have enough room to mount the inline blower. This should be either a solid wall, a stud, part of your home’s structure, or a framed area within your attic that is structurally sound enough to support the blower. Both points on the mounting bracket should be mounted to a stud, rafter, or joist.
Prepare Ductwork
The ductwork should already be installed before beginning your inline blower installation. See venting requirements above.
Inline Blower
Installation
First draw these markings on the installation area wall.
- Center line of installation area.
- Location of wall studs nearest to the center line. (One on each side)
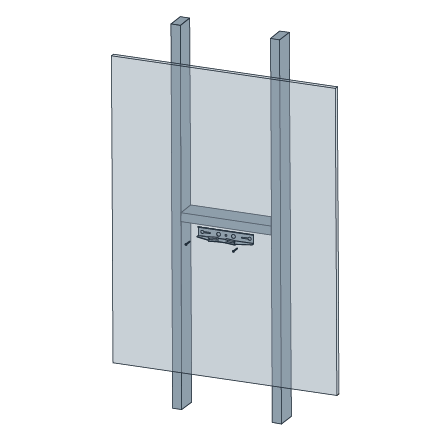
Insert Mounting Screws to the Wall
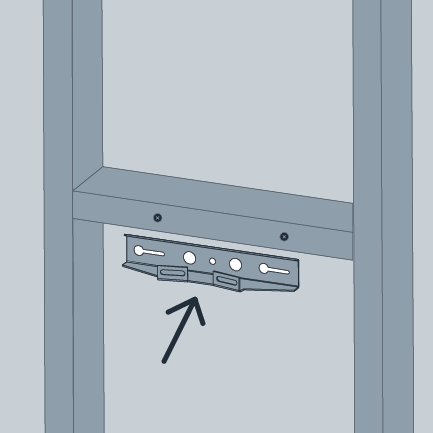
- After finding a location where you are going to mount your inline blower, find the specific location where your inline blower mounting bracket will go. Remember, the mounting bracket needs to be mounted to solid studs or rafters in the framing of your home or attic.
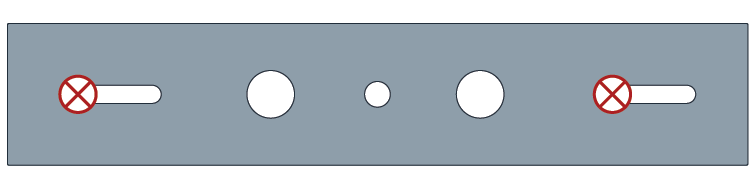
- Trace the two outer holes in the mounting bracket, as pictured in red on the diagram.
- Using the appropriate drill bit, pre-drill and insert the screws in your marked locations.
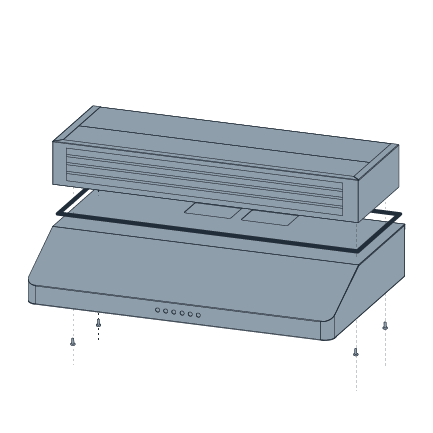
Install the Mounting Bracket to the Blower
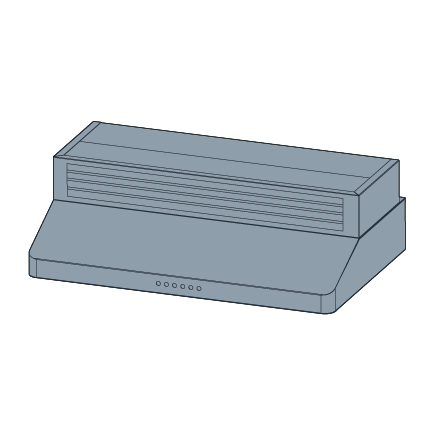
- Line up the two holes on the blower to the two curved channels on the mounting bracket that are facing away from the wall. Orient the blower so that the longer tapered side is facing up and toward the direction that the air will be forced.
- Fasten the blower to the mounting bracket using the machine screws provided with the blower.
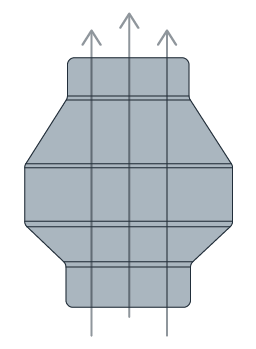
Mount the Blower + Bracket to the Wall
- Hang the blower by its bracket on the screws installed in Step 1. See Illustration for Step 3 (blower omitted for clarity).
- Slide the blower and bracket on its channel to the left and finish fastening the two screws to securely fix the blower to its installation location.
Attach Duct Work to the Blower:
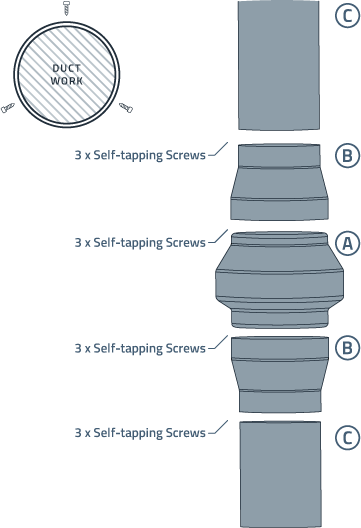
- This may require transition pieces (B) if your inline blower (A) does not match the diameter size of ducting (C) you are using.
- If your duct work set up requires transitions, place them (B) on both ends of the blower (A). Using your drill, screw three self-tapping screws, spaced evenly around the circumference of the transitions, into the blower. Generously wrap the seams of the connections with aluminum HVAC tape to seal any airflow that may escape.
- If it doesn’t require transitions, place the ductwork (C) on both ends of the blower (A). Using your drill, screw three self-tapping screws, spaced evenly around the circumference of the ducting, into the blower or transition pieces. Generously wrap the seams of the connections with aluminum HVAC tape to seal any airflow that may escape.
Run Power to the Blower:
- This process will depend on where you live and what your home’s electrical code entails. Always consult a professional electrician before powering your inline blower and range hood.
- The inline blower comes with a 110v plug which should be plugged in to the corresponding outlet in the back of your range hood. Run the cord down the outside of your ductwork to the back of your range hood.
*Always consult an electrician before directly wiring a hood to a power source.
This concludes the installation
of an inline blower
If you have any questions about the installation process please call or e-mail us.
-
Customer Support
877-901-5530 -
Email Support
Support@Prolinerangehoods.Com
Care &
Cleaning
- Never put your hand into the area housing the fan while the fan is operating.
- Turn off power to the hood before cleaning.
- Make sure your cooktop and hood are cool before cleaning.
- Use only the types of cleaning solutions mentioned in this manual.
- Completely dry the filter(s) immediately after cleaning.
- Regular care will help preserve the appearance of your range hood.
- Always wipe stainless steel surfaces with the grain to avoid scratches
- Clean periodically with hot soapy water and clean cotton cloth.
- For heavier soil, use a liquid degreaser such as 409™ or Fantastic™.
- If the hood looks splotchy, use a stainless steel cleaner on the surface. Promptly and gently remove cleaner with a soft towel or wipe.
- After cleaning, you may use non-abrasive stainless steel polish (such as 3m™ or ZEP™) to buff out stainless luster. Always scrub lightly and with a clean cotton cloth.
- Use corrosive or abrasive detergent (eg, Comet Power Scrub™ or EZ-Off™ oven cleaner).
- Use steel wool or scouring pads, which will scratch and damage the stainless steel surface.
- Leak cleaning solution onto or into the control panel.
- Allow deposits to accumulate or remain on the hood.
- Allow salt solutions, disinfectants, bleaches, or cleaning compounds to remain in contact with the stainless steel for extended periods.
Troubleshooting
- Turn on power at circuit breaker panel or fuse box.
- Check for tripped breaker or blown fuse.
- Make sure hood main power switch is on.
- Check the hood’s wiring.
- See “NOTHING WORKS”
- Swap out lights to determine if bulbs are defective.
- Make sure the range hood has been secured properly to the wall.
- Increase the fan speed, ensure that it is at a high enough setting.
- Make sure the ducting is sized correctly. Range hood will not function efficiently with insufficient duct size (IE, 9” duct over 8” hole).
- Check to see if duct is clogged or if damper unit (half-circular flapper) is installed incorrectly. A tight mesh on a side wall cap unit might also cause restriction to the air flow.
- Make sure there is at least 28” (71 cm) between the stove top and the bottom of the hood.
- Reduce the number of elbows and length of duct work. Check to ensure all joints are properly connected, sealed, and taped.
- Make sure power is on High speed for heavy cooking
Warranty
Three Year Warranty
- 3 Years - For three years from the date of original purchase, we will replace any parts or components that failed due to manufacturing defects.
- Only the original purchaser for residential products purchased in the continental United States (limited warranty in Canada, Hawaii, and Alaska).
- Consumable parts such as light bulbs and filters (stainless, aluminum, or charcoal).
- Damage due to natural wear, improper mounting, improper maintenance, or use of abrasive cleaning products.
- Chips, dents, or cracks due to abuse, misuse, or improper installation.
- Damage caused by accident, fire, floods, or natural disaster.
Installation
Videos List
How To Install an Under Cabinet Range Hood - PLFW115 & PLFW116 by Proline Range Hoods
How To Install an Island Mounted Range Hood - PLFI 520
Range Hood Installation - 36 inch ProV Wall Mount or Under Cabinet
How To Install Wall Mount Range Hood - PLFW544 & PLFW543
DIY: How to Install a Wall Mount Range Hood - PLJW 129
How To
Videos List
How to Wire a local blower in your ProV Island Range Hood
How to Cut Stainless Steel - Resize a Stainless Steel Chimney
How to Make your own 10 inch Ventilation
How To Wire a VexAir Full Variable Speed Range Hood Blower for Use with a ProV Range Hood
How to Hook up a Blower with any ProV Range Hood
How To Find a Stud Without a Stud Finder